Monday, November 29, 2010

Hangin' Out Pt. 2

So sorry to keep you all in suspense for so long (ha!) ;) I'm sure you're all dying to find out how the hammock stand turned out, right?! Well, when I left off last we were waiting out the rain....

and although we tried to keep the holes from filling up with water by placing plastic tarps around the poles and weighting them down to the ground, this unfortunately did not keep them completely water-free. So after dipping the water out of the holes with plastic cups we were back on track!


The next steps consisted of mixing concrete and pouring it into the holes, of which i have no pictures.... Guess i was too busy helping Mark with the concrete to take pictures this time! ;) After we let the concrete cure for a few days we then had to attach the long horizontal piece across the top to begin forming the pergola roof. These next pieces -- the horizontal piece and the small pergola slats -- had previously been cut at angles on the end by Mark and stained a semi-transparent Cedar Nautraltone by me.

Attaching these long horizontal pieces to the top of the 6x6 posts proved to be very difficult as they were quite heavy. So to save both Mark and myself from some typical spousal home improvement bickering ;), Mark asked his friend and co-worker, Greg, to come over and help us get this up. Greg and Mark had to hold the board in place with a level on top to make sure it was level, drill holes, and then screw the bolts in place. After this task was done on all 4 sides (one horizontal board on each side of the post) we then placed the perpendicular slats across the board to determine their spacing (Mark had previously figured how many we would need based on the length and he cut and I stained accordingly).


He fastened the slats to the horizontal board using galvanized L-brackets and screws.

After all of the slats were securely screwed into place and we stained the vertical 6x6 posts and removed the 2x4 supports, we were left with this: 


Not too shabby, eh?! We love it....it's in the perfect shady spot in our yard, right beside our garden. The leaves from the tree on the other side of the fence just barely touch the top of the pergola, creating the perfect relaxing breeze through the trees. Oh - and the blue sock looking thing on our hammock is a hammock cover by the way :) 

Hope y'all enjoyed seeing one of our most recent (notice I didn't say *latest*) projects!

xo, 
The Indecisive Wife

Thursday, November 11, 2010

Hangin' Out - Pt. 1

This is a project we tackled a while back but i haven't had a chance to post about it yet.  Our backyard is a definitely a marked target for us when it comes to improvement and renovations. The previous owners of the house had 3 dogs that spent a lot of time in the backyard so when we moved in the backyard wasn't in the best of shape...let's just say it had been neglected for some time.... Our first project back there was building our raised bed garden and our second project was this one -- a hammock stand with a pergola roof.

Luckily, my husband is a structural engineer so he was able to design the structure, making sure that it would actually stand up over time. He began with a couple sketches (which i found absolutely adorable)
  
He doesn't know I took the picture ;)

Then we figured out what kind of wood we needed, including specific sizes and amounts as well as bolts and concrete.  We then hopped in his SUV and took a trip to our neighborhood Lowe's (that is WAY too close to our house to avoid urges and desperately needs a Rewards program!!) and picked up all of our supplies. As always, getting all of the wood home without a pickup truck was interesting...

thank god Mark's back window rolls down in his SUV!

...but we made it!

Next, we decided placement in the yard and marked where the holes would be dug for the footings. We then marked the spaces with spray paint. And then...Mark dug.....and dug.....and dug.... Our yucky clay soil did NOT make it easy on him! 


After getting the holes dug we had to place the 6 x 6 posts into the ground. The trick here was to make sure that they were level. We did this by marking off where they would go in the hole with twine then placing them in the holes and lastly taping a level to the post to make sure it remained level within the hole. Mark then used 2 x 4's to secure the posts until we could pour the concrete in. 


Now it was time for concrete......but wait....it started to RAIN!!! And not just rain, but POUR!!!
We got soaked trying to cover up our holes with a plastic dropcloth so that the holes didn't fill with water. And the rain definitely delayed us for a bit!

Stay tuned for the next chapter in building our  hammock stand... :)

xo, 
The Indecisive Wife

Wednesday, October 6, 2010

Currently Listening To - Fall Edition

A few additions to my Currently Listening To list that can be found on the left sidebar....

Wild Nothings - Gemini


Cults - Go Outside


go here to download their EP for FREE, directly from the band: http://cults.bandcamp.com/


Tennis - Marathon
 07 - Tennis - Marathon by statemagazine


Enjoy your Fall! :)

Monday, August 23, 2010

30% off at Gap Brands (Old Navy, Banana Republic) Plus Support Charity!

Shop, Save and Support Charity!!

Give and Get is Here!: "Enjoy 30% off from August 26-29 at Gap, Banana Republic and Old Navy and we'll donate 5% of what you spend to a non-profit."

Wednesday, August 18, 2010

Destination: Dream

If only, IF ONLY,  I had a month off of work I would totally do this:


Literally, all you can jet for one flat rate for an entire month. Granted, it's only between the U.S., Mexico and Caribbean (so no Greek Isles or Amalfi Coast)...but come on! Anyone ever heard the term "island hopping"? H-E-L-L-O St. Thomas, St. John, St. Barts, St. Martin, St. Lucia, Turks and Caicos, The Bahamas, Jamaica, The Dominican Republic, Bermuda, Key West, Cozumel, then maybe hit some coastal cities....Playa del Carmen, Zihuatanejo, Cabo San Lucas, San Diego, San Fran, maybe hit up Napa Valley, Portland, Seattle, back to the East Coast with Miami, Savannah, Hilton Head, Charleston, The Hamptons, and Nantucket.   Ahhhhh, a girl can dream. Or possibly take a Sabbatical. Those are in now, right?! ;)

So...I wanna know, where would you go?!?

xo, 
The Indecisive Wife

**Update - I dug a little deeper into Jet Blue's website and they unfortunately do not travel everywhere I listed. Oh well, it's only a dream anyway! ;) **

Monday, August 16, 2010

Design Love

Welcome to my new installment of Design Love. You'll see these pop up every now and then and basically it's just gonna be something I've seen that I LOVE (yes, that's capital L- O - V - E). Whether it's a room, a piece of furniture, a piece of art, clothing, etc., I can guarantee you this: it's going to be something FAB! ;) So here we go...


Recognize this?! Anyone watch Design Star?? Well, this is Emily's room from the Glass Room Challenge. I LOOOOVVVEEE this room. The colors are beautiful; there's a lot going on, but it's not too cluttered. When she was designing this room she mentioned that she just loves pretty things and she likes putting those pretty things together...whether they relate or "go together" or not. Well, Emily, I love pretty things too and I think this room is just beautiful. Your eclectic style of mixing vintage with modern is right up my alley. You definitely have my vote....especially over that whiny prima donna Michael that thinks he's hot shit. Yea....I said it! Team Emily all the way!!!!

xo, 
The Indecisive Wife

Let the Wedding Coordinating Begin

but wait....my wedding was over a year ago....so this must mean that...
I'M HELPING COORDINATE A WEDDING!! 

That's right! In just 2 short weeks I'll debut as a Wedding Coordinator! 

Back last Fall I met Amanda through my friend Becky. Amanda was engaged and was planning a wedding for August 2010. She, like so many brides I know (myself included), was trying to plan her wedding without much outside help, while also working a full-time job. For those married ladies out there, we all know that planning a wedding could be a full time job itself so if you're going it alone then you're going to need either A) an extended amount of time to plan & prepare or B) some outside help. Well, Amanda decided to do a little bit of both...She has taken her time to plan and prepare for her perfect wedding (about a year long engagement) and she asked me to help her coordinate her Wedding day-of...things like setting up decor, organizing arrivals/departures and timelines and just generally making sure every last detail is attended to. We also began discussing design schemes early on and Amanda communicated to me that she wanted a very elegant, vintage inspired wedding. I LOVE making inspiration boards (decor is one of my favorite things about a wedding....next to the beauty and symbolism of the event itself...the organization of pulling off a flawless event comes in a close 3rd!) so I offered to put one together for Amanda. Based off of the color of the bridesmaid dresses and with keeping an elegant vintage theme in mind, I came up with this inspiration board:


I envisioned a jewel-tone color palette based off of Amanda's peacock blue bridesmaid dresses. The subtle repeating of brooches builds on the vintage theme, along with soft, garden-like florals. The addition of beautiful depression glass also adds to the vintage aesthetic. Amanda shared the inspiration board with her florist...so I can't wait
to see what they came up with. Amanda will be reusing her bridesmaid's bouquets as centerpieces for the reception. We'll also be injecting some Black and White Damask into her reception. Anyone remember these: 

Yep, these are the table toppers that my mother-in-law made for mine and Mark's wedding. I ordered the fabric from buyfabric.com and measured out the sizes then Mark's Mom graciously made 7 of these for me to use at our wedding last year. I'm happy to share these with Amanda for her wedding. We'll be using one on the Bride's Cake table and one on her guestbook table in the foyer entrance area of her reception. 

I'm so excited to be helping Amanda with her wedding. They're a beautiful couple and I'm sure it's going to be a beautiful wedding! I'll make sure to give you all a recap of the day and how everything turned out.

talk soon,
the indecisive wife :)

Friday, August 6, 2010

New Addition


Ha! ...just playin'. I had to. 


This is our REAL New Addition:


Her name is Evie Grace Boger and we adopted her from the Humane Society on June 28th.
(btw, it only took us about 2 1/2 weeks to give her a name...not too bad considering it took us about a month to name Rufus....the poor thing was known by "kitty" for the first month or so of his life)

She's a cutie and yes, she gives Rufus a run for his money. She's only 4 months old now, but she can totally hang tough with him (yes, that's another subtle reference to a boy band. i couldn't resist). I was really worried about introducing this new member of our family to Rufus, but to my surprise Rufus took it really well and they were already playing together after the 1st week. We're not yet to the snuggling together phase, but I have hopes they'll get there eventually. There's definitely still some sibling jealousy going on, but it's much, MUCH better than I had worriedly anticipated. And just to add some cuteness to your Friday, I'm gonna share more pics for your viewing pleasure :)


Me holding her at the Humane Society    Mark holding her at the Humane Society
In her carrier on the way to the vet


Working Hard at the office with Mom :)


Happy Friday y'all!!! 

xo,
The Indecisive Wife

Tuesday, August 3, 2010

Lighten Up!

We have a great screened-in porch and covered deck right off of our kitchen and living room. Actually, this was one of the selling features of the house that really appealed to us because Mark and I both love to spend time outdoors. As we toured the house for the first time, we immediately noticed the neglect that this screened-in porch had endured over the years. The ceiling was plywood...that's it. No paint, no nothing. Between that and the fact that the deck was graying badly and in desperate need of re-staining and sealing, I knew this was going to be project that we would have to tackle at some point....and why not wait until the hottest part of the summer (100 + heat indexes) to tackle it?!

We started with the screened-in area. I decided to paint the ceiling just a basic white because the trim on our siding was white. In addition to giving the ceiling a "finished" look (as opposed to the unfinished look of plywood boards), we also had the goal of brightening up the area. This deck is right off of our Living Room which has two large double windows that look right out onto the deck. Having this covered deck and screened-in porch is great, but it really blocks a lot of the natural sunlight from pouring into our Living Room so we wanted to help brighten up both the deck and the Living Room by using some lighter colors.

In order to add some interest to the basic white we decided to trim the ceiling in a warm brown color (Granite by Olympic Paint in Exterior Satin). We also decided to add some trim pieces to the ceiling itself in order try to "up" the architectural detail a bit. Since I was basically covered in paint and sweat the entire time we were doing this project -- Oh, and by covered I mean COVERED....I even had little white paint specks in my contacts....IN MY EYES y'all! -- I didn't really get to take any pictures of the process. But after 2 weekends and a random weekday night we were left with these results:


We're happy with the way it turned out....and we're definitely glad it's over....painting over your head is hard work y'all!!! Next up....restain and reseal the deck! We've already selected and purchased a semi-transparent Cedar Naturaltone shade made by Olympic....we just have to get started. Although I think we might take a break from the deck and "painting" projects and get started on a building project instead -- a Permanent Wooden Hammock Stand with Pergola Roof. We already have the hammock...it's a super comfy extra large Mayan Style woven hammock...and Mark has already drawn up the plans for it so now all we have to do is purchase the materials and get started building! Stay tuned for our progress on this project! ;)

xo,
The Indecisive Wife

Saturday, July 31, 2010

Wedding Pictures - Help Me Choose!

Okay, so here's the deal....I'm trying to pick 2 pictures to print as 11 x 14's for a picture ledge that we've just installed in our Dining Room. I've chosen two color photos and two black and white's. Our Dining Room looks something like this:
So we're working with a deep purple wall under the chair rail, a creamy off-white above the chair rail, champagne-ish/gold and black flocked damask curtains, a black table, white chairs and a dark walnut buffet with gold hardware. The picture ledge is black and is on the opposite wall that you can't see here. (oh, and btw, that cheapo looking standard builder's chandelier will eventually be replaced by a black crystal chandelier)

So.....Option 1:


And Option 2: 


So, cast your votes! Option 1 or Option 2...which would you pick?! ......HELP!! :)

xo,
the indecisive wife

Thursday, July 29, 2010

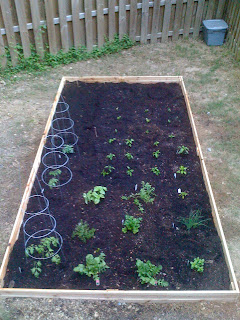
Mary, Mary quite contrary, How Does Your Garden Grow?

Well, it started out about like this....

I take that back.  It actually started out as a barren part of our backyard with patchy grass and crappy clay filled earth. BUT, I saw potential! It was, on a positive note, the sunniest spot in our backyard. Although our immediate backyard (read: the part that is fenced in) is devoid of any trees, there are numerous tall trees looming over our fence, casting afternoon shadows on our northeasterly facing house. So this sad little unlevel spot was just gonna have to do! 

Our Plan A was to use old (FREE) railroad ties to set up the garden....fortunately, it was brought to my attention that those old relics typically contain creosote, which is known to have a "carcinogenic character". Oops! On to Plan B...

Plan B was to use cedar. Since Plan A was free, Plan B was a much more expensive option, but we bit the bullet and made the short trek to our neighborhood Lowe's to pick up some cedar planks. We decided to keep it easy and make the garden 12 x 8 since that's what length options were available in cedar. Mark then dug out the area to make it as level as possible and started attaching the cedar together. We placed two planks on top of each other to create a taller ledge for the walls. I believe they were 4" each so we made the walls 8" high. After the fairly simple construction, it was time to fill the garden with some dirt we picked up since couldn't use our Alabama clay infested soil.  

Instead of buying the more expensive Miracle Grow brand Organic Dirt, we opted to buy the cheapo Evergreen brand of top soil, hummus and compost. We mixed all of these together in a wheelbarrow and began filling the garden.....and filling the garden....then another trip to Lowe's....and filling the garden....then a trip to Walmart (cause Lowe's had closed)....and filling the garden. Then calling it a night cause we could no longer see in the dark....one more trip to Lowe's the next day and 18 bags later we finally had the garden filled! Uh, yeah....we obviously underestimated a few times ;) 


We planted 3 tomato plants of different varieties (2 heirloom and 1 cherry), arugula, mint, chives, basil, oregano, parsley, zucchini, green beans (bush variety), bell peppers (1 green, 1 yellow, 1 red), jalapeno peppers, sweet banana peppers and a super hot chili pepper and watermelon. The green beans and the watermelon are the only plants we planted by seed...but luckily, they came up just fine!

The garden grew quickly, but the tomato plants grew so much, so fast that we had to restake them using 5 ft. tall tomato trellises. Unfortunately our rain in Alabama this summer has been few and far between so Mark and I have to make sure to water the garden every other day....we've found the easiest way to do this is to keep a sprinkler on one end of the garden and just walk out, turn it on, and let it go for about 10 -15 minutes. I have to say, this garden has been a big success and we love having it! We're producing so many tomatoes from these 3 little (well, BIG) plants that we can't even keep up with eating them so we've been taking them to work and spreading the love around! Not to mention, it's so awesome to have all of these herbs just steps from your kitchen....it's really allowed us to expand our weekly recipes without making additional trips to the grocery store. 


So if you're wanting to start your own vegetable garden at home, but don't know where to begin....just go for it! Crappy soil shouldn't hold you back...you could always set up a raised bed garden like we did! Think it's too expensive?! No way! This garden - including materials (cedar, wood screws, 18 bags of dirt) and plants cost us under $100 to put together. And trust me, we've gotten way over $100 worth of vegetables out of it in just this first season. Plus, I can't wait to do cold weather plants like cabbage and broccoli! We could even mix in some flowers as filler if we don't feel like having such a big garden every year. Plants like marigold are good companion plants for a garden - keeping away lots of nasty pests that you don't want eating away at your hard work. And for future purposes, we think the garden gives a nice quaint feel to our home (you can actually see the garden from our kitchen window) and would be an asset for any potential buyer. So roll back those sleeves and reveal those green thumbs....home vegetable gardens are IN! :)

Thursday, June 24, 2010

Dream Bed

I'm married and we still sleep in a double bed.

I used to think that this statement was not that odd, but the more I mention this fact to people, the more I get odd looks. You know, the kind of look you might give a two-headed person. The kind of look that combines shock and disgust. The kind of look that makes me think..."hey, maybe we should splurge for a new bed". Did I also mention that this bed (read: mattress) is over 10 years old? That it was mine in highschool, throughout college and now on into my adult years? Cause it is. Did I also mention that this bed has no headboard or footboard and that it is literally just a mattress, boxspring and bedframe? ....Yeah, I think it's probably about time for me to grow up. So that brings us to....

Dream Bed #1:


The Ella Bed from Z Gallerie
Queen: $1499.00
King: $1599.00

And...

Dream Bed #2:


The Farmhouse Bed from Potterybarn
Queen: $1449.00 - On Sale for: $1199.00
King: $1649.00 - On Sale for: $1399.00

So, we have elegant & comfy versus classic & structured. I loooovvvvee both of these looks and honestly, I'd take either ;) Which is your favorite? I think both of these beds exude the mood you want for your master bedroom...luxurious getaway. They both SCREAM master bedroom...they're very attention drawing beds that would be the focal point of any room. 

I listed both the queen and king prices because I'm not sure which size bed we'd get. Our current master bedroom could definitely handle a King sized bed (with room to spare), but I'm not sure what size bedroom we'll be working with down the road. Plus, when Mark and I travel and we sleep in king sized beds they seem SOOO big. almost too big! I sometimes even forget he's in the same bed as me! A queen bed seems more appropriately sized for us because neither of us are very large people...but down the road would we want a larger bed? Looking at the current rate that we buy beds (um...not very often or maybe more closely aligned to never!) in addition to the price tag on these, we're gonna have this bed for a WHILE! At this point it's only us and Rufus -- who insists upon sleeping with us every night -- but we're very shortly going to be adding one more to our family.......another baby kitty! :) Our little double sized bed is gonna get even more overcrowded, I imagine. 

So...how bout you guys weigh in for me...do you prefer a queen or a king and why?

And I'll leave you guys with this:


a *slightly* embarrassing old picture (circa 2007) of Rufus' sleeping habits. ....yeah, he's a snuggler alright. I couldn't imagine where he gets that from ;)

xo,
the indecisive wife
Thursday, June 17, 2010

Slim Down....by Drinking Chocolate Milk?!

It's true. The Calcium, Vitamin D & Protein found in 1% Chocolate Milk can help you slim down! And notice I said 1% -- not Fat Free! Apparently your body needs *some* of the fat to help break down the Vitamin D. Check out the details here:

The Chocolate Milk Diet | Eat This, Not That

All you have to do is drink chocolate milk three times and day and eat nothing else for a week.

.....AHHHHHHHH, JUST KIDDING!!!!

It's actually not a "diet" at all. They just suggest drinking chocolate milk (along with your regular routine of diet and exercise) 3 times a day -- once in the morning, once before you workout, and once after you workout. If you don't workout that day then just drink a glass morning, afternoon and evening. Doesn't sound so bad right?!

My husband is gonna be thrilled. He LOVES chocolate milk!

Wednesday, June 16, 2010

Please Excuse Me While I Whine...

Consider that your warning....you may want to turn away now.

I have a lot of good things going for me in my life and some days (weekends/nights) I see that. I have a wonderful husband. Let me say that again.... A WONDERFUL husband. He understands when I'm stressed...he cooks breakfast on the weekends...he never pours himself a cup of coffee without pouring mine as well...he supports me...he does laundry (while sometimes drying my "lay flat to dry" clothing, but eh - mistakes sometimes happen!)....he loves (for the most part!) doing projects around the house with me...I say I want to build something and he designs it...and builds it....he tolerates my incessant need to "improve things"....he opens my car door when we go out to dinner...he writes me messages on the lunch he packed for me while he was packing his own....he holds my hand at the table at dinner....he goes to get me "fill in the blank" when I give him puppydog eyes....and on, and on, and on...

I also have a great "first" house and a sweet snuggly kitty cat. I have a nice car to drive and we have the ability to take yearly vacations. I have a job. My husband has a job...a "good" job. And we're happily married (the first year is the hardest?! hogwash!!).

So yeah, I know I have a lot of things to be thankful for, but all of that just gets buried in my everyday life. I want ME time...US time. Every week we look forward to the weekend...and then the next weekend and then the next holiday and then the next vacation....and before I know it years have passed by. I feel like I'm wasting my life. I sit at a desk everyday and work my ass off...stress out, harbor anxiety and what do I get for it? A fat ass paycheck? No. A sense of accomplishment? Not really. ...cause it's the same thing every month and it's not like I even get to see my hard work enacted. Appreciation? Hell No. I rarely ever, EVER get "Thank You's"-- instead I get complaints about how things could be better...little nit-picky things. I get emails unread, requests not met, questions unanswered and just a whole helluva lot of frustration.

I have this very aggravating habit to always do my best. I put a lot of pressure on myself to do a good job at whatever it is I'm doing. And to be quite honest, I'M getting sick and tired of trying. It always seems like the person that works the hardest and complains the least always gets the shit end of the stick. Shouldn't they be rewarded? Or at the very least appreciated? But, no...they get extra work and no extra pay.  I don't know, maybe that's just some crazy notion I have of work and of being a good employee. Or maybe I need a new career.

Why is it that we're expected to spend nearly 72% of our year working? that leaves us with only 28% of our own time doing what we actually WANT to do. That's insane!! I don't want to be forced to live my life by someone else's rules for the majority of my life (cause technically, we're SUPPOSE to be able to retire someday - right?!). I've gotta figure this out...maybe I need a new plan. Always playing by the rules and following the norm isn't always the right thing to do. I want to live at the beach...in warm weather and I want to make my OWN schedule and play by my OWN rules. I want to be able to wake up in the morning when I want to...and go workout, have breakfast on my screened-in porch and THEN go to work. If I want to go see a show and have a few drinks on a weeknight I want to be able to do that without worrying about having to wake up and go to work in the morning. I'm nearly 5 years in to this "routine" and I'm so over it.

Monday, March 22, 2010

DIY - closet shelves (aka, project # 5-ish)

It's officially Spring in Alabama but it's still 39 degrees outside. Okay, okay...to be honest we've had some really lovely Spring days so far....all 4 of them have been perfectly enjoyable. (wah-wah)

SO...until it gets warm and stays warm, the hubs and I are stuck working on indoor projects. A couple weeks ago we decided to tackle our custom closet shelves that we've been planning to build in order to take advantage of our large walk-in closet (yeah, that definitely tipped the scales in favor of our house for me!). Our closet previously consisted of a long wall of wire closet shelving where all of our clothes hang (oh yeah, there's definitely a future DIY closet system in our future), 2 short side walls - one with a window and the other with a small wire rack for hanging clothes and a laundry chute that previously did not have a door on it (it was just an open hole that went down to our laundry room...our kitty was quite intrigued by this) - and the front wall which had the doorway into the closet on it, but nothing else. We decided to build floor to ceiling shelves on each side of this doorway, which yielded us one 4 ft wide shelf and one 3 ft wide shelf.  Mark took all of our measurements then we divided it all up to determine our number of shelves. I wanted the majority of it to be spaces for shoes and the rest to be larger shelves suitable for sweaters and clothes storage (which will be housed in canvas bins). We also left some taller spaces at the bottom of the larger shelf for boots.

After doing a little research online, we determined that BC grade plywood in pine would do the job just fine for our shelves, so off to the neighborhood Lowe's we went. We selected 3 sheets of 15/32 4' x 8' pine plywood. Luckily, Mark had determined beforehand how many sheets we would need in order to get all of the cuts we needed and he also determined all of the measurements for those cuts so that we could have Lowe's make all of the cuts for us. That's right...Lowe's will cut your wood for FREE! We learned this little trick after doing the beadboard in our downstairs half bath makeover. We picked up a few more things like trim, brackets and wood screws and about $100 later we were on our way back home to start our work. 


All of the wood piled into the back our SUV.

The next few work days consisted of sanding and painting the wood. As a last step before we put it together we took the advice of the older gentleman at Lowe's that was cutting our wood...he told us that we should put a coat of polyurethane on it after we finished painting it. Well, after two coats of white paint we put a coat of poly on it...clear semi-gloss. 


Here's the larger 4 ft shelf after it was assembled and put into it's place in the closet


And here's the smaller 3 ft shelf in it's place in the closet. You can see that i was trying it out with some shoes ;) 

After the poly dried we noticed that the white paint now seemed to have a splotchy yellow-ish tint to it. The poly directions said we should sand and then put another coat of poly on it after sanding. Well, too bad we read those directions AFTER Mark had started putting the shelves together. Trial and Error, right?! So, Mark finished assembling the shelves and then we mounted them to the wall using L-brackets that I had painted white. Unfortunately the yellow tint was just as visible in our closet as it was before, so after painting the trim and nailing it to the shelves we proceeded to paint yet ANOTHER coat of white paint over the entire units. (the above pictures were taken before the trim was added and before the additional coat of white painted was applied. you can see the yellow-ish tint in it - no?)

Painting these shelves after they were attached to the wall was no easy feat, but Mark suggested putting a sheet of paper between the wall and the shelf and it made the painting MUCH easier! Smart boy!


Here's the smaller shelf after the last coat of white paint with the trim attached. You can kinda see in this picture how we angled the shelves that the shoes would be on. I wanted to do this so that you could get a better view of the shoes even as the shelves increased in height. In order to keep the shoes from falling off we just picked a larger piece of trim that would leave a "lip" on top for those shelves. 

Here's the finished picture of the larger shelf:


This shelf is mainly for shoes, but it does have 2 cubbies that will have canvas bins in them that will probably be for socks, tights, leggings and possibly one for belts. The lower portion is obviously for boots.

And here's a close up view of the slanted shoe shelves:


So....there ya have it! Project # 5-ish (or it could be #4, depending on whether you count us hiring someone to refinish our floors as a "project" or not, since we really didn't do much on that one). I can't wait till we can get out and start on our backyard makeover project...stay tuned for that one...I'm sure it's gonna be a doozy!