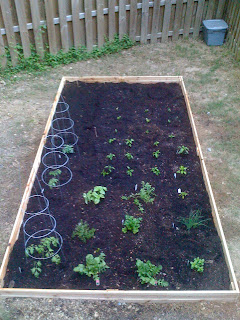
Well, it started out about like this....
I take that back. It actually started out as a barren part of our backyard with patchy grass and crappy clay filled earth. BUT, I saw potential! It was, on a positive note, the sunniest spot in our backyard. Although our immediate backyard (read: the part that is fenced in) is devoid of any trees, there are numerous tall trees looming over our fence, casting afternoon shadows on our northeasterly facing house. So this sad little unlevel spot was just gonna have to do!
Our Plan A was to use old (FREE) railroad ties to set up the garden....fortunately, it was brought to my attention that those old relics typically contain creosote, which is known to have a "carcinogenic character". Oops! On to Plan B...
Plan B was to use cedar. Since Plan A was free, Plan B was a much more expensive option, but we bit the bullet and made the short trek to our neighborhood Lowe's to pick up some cedar planks. We decided to keep it easy and make the garden 12 x 8 since that's what length options were available in cedar. Mark then dug out the area to make it as level as possible and started attaching the cedar together. We placed two planks on top of each other to create a taller ledge for the walls. I believe they were 4" each so we made the walls 8" high. After the fairly simple construction, it was time to fill the garden with some dirt we picked up since couldn't use our Alabama clay infested soil.

Instead of buying the more expensive Miracle Grow brand Organic Dirt, we opted to buy the cheapo Evergreen brand of top soil, hummus and compost. We mixed all of these together in a wheelbarrow and began filling the garden.....and filling the garden....then another trip to Lowe's....and filling the garden....then a trip to Walmart (cause Lowe's had closed)....and filling the garden. Then calling it a night cause we could no longer see in the dark....one more trip to Lowe's the next day and 18 bags later we finally had the garden filled! Uh, yeah....we obviously underestimated a few times ;)

We planted 3 tomato plants of different varieties (2 heirloom and 1 cherry), arugula, mint, chives, basil, oregano, parsley, zucchini, green beans (bush variety), bell peppers (1 green, 1 yellow, 1 red), jalapeno peppers, sweet banana peppers and a super hot chili pepper and watermelon. The green beans and the watermelon are the only plants we planted by seed...but luckily, they came up just fine!
The garden grew quickly, but the tomato plants grew so much, so fast that we had to restake them using 5 ft. tall tomato trellises. Unfortunately our rain in Alabama this summer has been few and far between so Mark and I have to make sure to water the garden every other day....we've found the easiest way to do this is to keep a sprinkler on one end of the garden and just walk out, turn it on, and let it go for about 10 -15 minutes. I have to say, this garden has been a big success and we love having it! We're producing so many tomatoes from these 3 little (well, BIG) plants that we can't even keep up with eating them so we've been taking them to work and spreading the love around! Not to mention, it's so awesome to have all of these herbs just steps from your kitchen....it's really allowed us to expand our weekly recipes without making additional trips to the grocery store.


So if you're wanting to start your own vegetable garden at home, but don't know where to begin....just go for it! Crappy soil shouldn't hold you back...you could always set up a raised bed garden like we did! Think it's too expensive?! No way! This garden - including materials (cedar, wood screws, 18 bags of dirt) and plants cost us under $100 to put together. And trust me, we've gotten way over $100 worth of vegetables out of it in just this first season. Plus, I can't wait to do cold weather plants like cabbage and broccoli! We could even mix in some flowers as filler if we don't feel like having such a big garden every year. Plants like marigold are good companion plants for a garden - keeping away lots of nasty pests that you don't want eating away at your hard work. And for future purposes, we think the garden gives a nice quaint feel to our home (you can actually see the garden from our kitchen window) and would be an asset for any potential buyer. So roll back those sleeves and reveal those green thumbs....home vegetable gardens are IN! :)


